
How to Build a Deck in a Weekend with CAMO
Building a deck doesn’t have to be a weeks-long project! With the right tools and a bit of preparation, you can transform your outdoor space in just a weekend. CAMO products are designed to make deck building faster and easier while delivering professional results. Whether you’re an experienced DIYer or tackling your first big project, this guide will help you confidently build your new deck in record time.
How CAMO Fast-Tracks Your Weekend Deck Build
CAMO tools and fasteners are designed to simplify deck construction while delivering quality results. Here’s how they can make your weekend project a success:
- Ease of Use: CAMO’s innovative tools are intuitively designed and easy-to-use, reducing the learning curve for first-time builders and weekend warriors.
- Speed and Precision: CAMO tools ensure consistent board spacing, alignment, and precise fastener placement, saving time on adjustments and delivering a professional finish.
- Everything You Need: CAMO offers an impressive variety of game-changing, deck building and board fastening solutions that make deck building easier, from heavy-duty foundation blocks that are lighter than cement blocks to rugged structural fasteners and hidden deck clips.
- Time-Saving Design: CAMO tools streamline every step of the deck-building process, from aligning boards to securing fasteners, helping you complete your project faster—and better.
Tools and Materials
CAMO Deck Essentials
- CAMO BLOCK: Ultra-durable, floating foundation bases to hold joists or posts for freestanding, low-profile decks, eliminating the need for digging or concrete
- CAMO Joist + Ledger Deck Tape: Self-adhesive butyl tape creates a waterproof membrane to protect wood deck framing
- CAMO Structural Screws: Code-crushing and highly corrosion resistant for secure, structural connections
- CAMO LEVER: Expertly designed to bend and lock deck boards in place for faster installation and uniform alignment.
- CAMO Hidden Deck Clips: Pre-assembled, one-pass fasteners for securing grooved deck boards, with consistent spacing for a fastener-free surface
OR
- CAMO MARKSMAN Edge Guide and CAMO Edge Deck Screws: Cleverly crafted for edge fastening square deck boards with consistent spacing and screw placement, while reducing splitting and cracking
Other Deck Materials You’ll Need
- Pressure-treated wood, composite, or PVC decking boards
- Lumber for joists, beams, and blocking
- Drill
- Circular saw
- Measuring tape
- Level
- Safety gear (gloves, goggles, etc.)
Building a Freestanding Deck
Here, we’ll focus on a freestanding deck without railing or steps—ideal for creating an outdoor retreat in a weekend. Whatever plan you ultimately settle on, you can count on CAMO products to bring ease and precision to every step of your build.
Before the Big Weekend
Plan and Prep
- Design: Keep your deck design simple and rectangular for a quicker build. Decide between a ground-level deck or slightly elevated platform deck. By keeping the height low (up to 30 inches), you can stabilize your deck using convenient CAMO BLOCK support bases.
- Site Preparation: Clear the site and ensure the ground is compact and stable. You can use CAMO BLOCKS on any stable surface, including uneven ground with a little leveling.
- Pressure treated lumber: When working with PT lumber, make sure it is fully dried out before building your deck. Learn more with our guide to pressure treated decking.
- Tools and Permits: Assemble your tools and materials. Your freestanding deck may not require a permit, but check with your local building authority before construction and allow enough time—usually one to two weeks—in case permits are needed.
Day 1: Foundation and Framing
Let’s get this project started!
Lay the Foundation
For a Ground-Level Deck:
- Level and place CAMO BLOCKS at evenly spaced intervals, a maximum of 60 inches apart, with joists placed 16 inches on center. The precision-molded BLOCKS hold the joists, streamlining your project and eliminating the need for beams.
- If your joist spans are short (under 8 feet), blocking may not be necessary but can still be used for added stability or to attach fascia boards. See Build the Frame.
For an Elevated Platform Deck:
- Use CAMO BLOCKS to stabilize your posts (4×4 or 6×6, up to 30 inches) that will support your deck beams.
- Level and space the blocks no more than 60 inches apart for stability and proper load distribution, then place the posts into the BLOCKS.
- Secure the beams perpendicular to the posts using CAMO Multi-Purpose Hex Head Structural Screws. Place the screws one inch from the top and bottom edges of the beam where it intersects the post and drive them straight through the beam on each side.
- Double-check that all supports are level and square before moving to the next step.
Build the Frame
For an Elevated Platform Deck:
- Space your joists evenly at 16 inches on center, attaching the joists to the beams using joist hangers and CAMO Structural Screws.
- Add blocking (short pieces of lumber installed perpendicular to the joists) between the joists for additional support and to secure fascia boards later.
- Use structural screws to fasten blocking and secure any additional connections.
- Confirm that your project is level and square before proceeding.
- Apply CAMO Joist + Ledger Deck Tape and ensure that all surfaces are clean and dry.
Day 2: Decking Installation
This is where it all comes together!
Install Deck Boards
With CAMO, you have the flexibility to choose between edge-fastening with CAMO Edge Deck Screws or using CAMO Hidden Deck Clips, depending on your decking board profile. Use either method to create an uninterrupted, fastener-free deck surface—quickly.
To Edge-Fasten Square Boards:
- Begin at one edge of the frame, aligning the first deck board.
- Attach the CAMO MARKSMAN Edge Guide to your drill. The MARKSMAN ensures precise screw placement and no spacing between deck boards. The MARKSMAN tool is the preferred method when building with PT lumber because no spacing allows for shrinkage as the wood dries over time.
- Load CAMO Edge Deck Screws into the MARKSMAN’s guide.
- Drive the screws into the sides of the deck board and down into the joist. Continue along the length of the board, securing it to the frame.
- Repeat the process for each subsequent board.
To Install Grooved Boards with Hidden Clips:
- Position the pre-assembled CAMO Hidden Deck Clips in the groove of the first board, aligning the clips over the joists.
- Insert the next deck board into the clips, making sure it’s properly seated and aligned.
- Drive the fasteners into the joists with one of these methods:
- For handheld installation, use the CAMO NEVER-MISS Guide for straightforward screw placement.
- For faster, standing installation, use the CAMO ClipDRIVE tool. Attach the ClipDRIVE to your drill (not an impact driver) and start with the lowest torque setting, increasing only as needed. The ergonomic, height-adjustable handle and weighted nose make it easy to target and drive the screw heads, speeding up the install–without bending or kneeling.
- Repeat the process for each subsequent board, using the CAMO LEVER to align and lock multiple boards and clips in place and further streamline your build.
Finishing Touches
- Trim overhanging boards with a circular saw for a clean edge.
- Optionally, secure the fascia boards to the rim joist or blocking using CAMO Premium Trim Screws to create a finished deck perimeter.
Tips for a Smooth Weekend Deck Project
- Pre-Cut Lumber: Have your materials cut to size beforehand to save time during construction.
- Read the Instructions: Review manufacturer recommendations and guidelines ahead of time to avoid surprises and achieve the best results.
- Enlist Help: A buddy can assist with aligning joists or securing boards, but if you’re short on volunteers, don’t worry: CAMO tools simplify deck installation, making the build process manageable even if you’re going solo.
- Rely on CAMO: Leverage the precision and efficiency of CAMO products and tools to minimize mistakes and speed up the process.
Ready to Build Your New Deck?
By following these steps and using CAMO tools, you can confidently build your new deck in just a couple of days. To transform your outdoor space with minimal time and effort, choose CAMO for the deck tools and products you need, then mark your calendar—your new deck is only a weekend away!
Choosing the Right Deck Fastener
Your deck is an investment—be sure you’re using the best fastener for your project.
Decks are no longer just a spot to grill. They have become outdoor living spaces, extensions of your home to enjoy for years to come. While every deck requires routine maintenance of cleaning the boards or staining if needed, one thing you’ll hopefully avoid is ever having to replace boards. You can reduce this potential by being selective with the deck fasteners you use. Typical deck screws, or deck nails, that are fastened through the face of the board have a higher tendency to split or crack the decking. Once you add some moisture to the mix thanks to rain or snow, the decking won’t just look bad—it will be damaged beyond repair.
All that to say that the type of fastener you use is just as important as the kind of decking you install. While there are various fastening options available, CAMO offers deck fastening systems to help you install decking smarter, faster, easier, and better than other products. So first, let’s break down some information about coatings and alloys, then walk through options based on the type of decking you want to use.
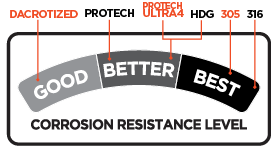
Fastener Coatings and Alloys
Depending on where you live and the kind of deck project you’re installing, you’ll need to be sure you’re using a fastener with the correct coating or alloy to protect your project against rust and corrosion.
PROTECH™

PROTECH is CAMO’s proprietary fastener coating suitable for use with pressure treated lumber, PVC, composite, and capped composite deck boards in inland environments that face regular exposure to the elements. It’s available in various colors to blend into whatever decking you use.
305 Stainless Steel

305 Stainless Steel fasteners are ideal for exterior structures 3,000 ft. or further from a saltwater shoreline or any outdoor project that you want to protect against potential corrosion. They offer an excellent aesthetic finish in installations of pressure treated, PVC, composite, and capped composite boards.
316 Stainless Steel
If you want to install the best type of fastener for your build, 316 Stainless Steel is the only choice. 316 Stainless Steel is required in coastal, marine, or waterway areas within 3,000 ft. of saltwater. It is also the best practice for structures exposed to chlorine, wood strippers, or ice-melting chemicals and agricultural environments that deal with chemicals, pesticides, and treatments. You’ll also need to use 316 Stainless Steel if you’re installing cedar, redwood, or hardwood decking where tannin release caused by carbon fasteners may cause staining.
Deck Fasteners by Board Type
Now that you understand alloys and coatings let’s review the best CAMO deck fasteners by board type.

Pressure Treated Lumber Decking
Remember the split boards we mentioned earlier? We were referring to pressure treated lumber, which, while it’s the least expensive option, doesn’t have the lifespan of other types of decking—especially if you don’t use the right fastener.
The best fastener to preserve the face of the deck board and add longevity are CAMO Edge Screws that secure the boards to the joist through the edge. These innovative screws feature a patented rake tip that augers board material as they’re driven, reducing the potential for splitting and cracking, and a trimhead that reduces visibility on the side of the board. For pressure treated lumber, install Edge Screws using the MARKSMAN Pro®-X1 tool that clamps to the board and creates 1/16 in. spacing. For no gap between boards, use the MARKSMAN Edge Tool.
For a faster and more comfortable installation with the same great hidden fastener result, use the CAMO DRIVE® tool with Collated Edge Screws for Wood and Composite. With the stand-up fastening tool, you can quickly move from joist to joist, securing the boards in no time. In addition, using DRIVE will leave no gap between boards at all, which is great for wet pressure treated lumber that will shrink over time.
If you desire the traditional look of a face-fastened deck, use the CAMO DRIVE and Collated Face Deck Screws for Pressure Treated. These screws have the same rake tip as the Edge screw, so the board material is removed while you drive the screw, reducing the potential for splits and cracks.
Cedar and Redwood Decking
Cedar and redwood follow similar guidelines as pressure treated lumber, so Edge fastening is the best way to secure them. However, you will want to use 316 Stainless Steel Edge Screws to prevent tannin staining. Luckily, CAMO Edge Screws have a black coating that blends into the side of the board, still giving you that hidden fastener finish instead of seeing bright Stainless Steel between the boards.
You’ll need to leave a 3/16 in. gap between deck boards to allow for expansion and contraction, so use the MARKSMAN Pro® tool for hand drive installations, or use secondary spacers with the DRIVE tool and 316 Stainless Steel Collated Edge Screws for Wood and Composite.
Square Hardwood Decking
If you’re investing in a natural hardwood that offers strength, durability, and beautiful, long-lasting aesthetics, you don’t want to blemish the surface with a regular deck screw. Instead, preserve its beauty and achieve a fastener-free surface on Ipe, Cumaru, Tigerwood, Kebony, Angelique, and Merbau decking with the MARKSMAN Pro® tool and 316 Stainless Steel CAMO Edge Screws.
Given the density of the boards, you will need to pre-drill holes before fastening to eliminate any potential for splitting the board or snapping the screw. To speed up fastening, we recommend using two drills, one with the pre-drill bit and one with the driver bit, so you can place the MARKSMAN Pro tool, run the pre-drill bit through it, drop the screws in, and fasten.
Square Composite and PVC Decking
Hopefully, you’ve caught on by now, so it shouldn’t be surprising that Edge fastening is the best way to install square composite and PVC decking. For uncapped composites and PVCs, you don’t need to pre-drill holes before fastening screws. That means you can fasten with either the MARKSMAN Pro tool or standing up with the CAMO DRIVE tool and Collated Edge Screws for Wood and Composite using secondary spacers to create a 3/16 in. gap between boards. For capped composites, on the other hand, you will need to pre-drill holes before fastening to avoid any mushrooming or difficulty driving, so only the MARKSMAN Pro tool is recommended.
For a traditional face-fastened look in a fraction of the time of crawling around on your hands and knees, use CAMO Collated Face Screws for Composite with the DRIVE tool. These screws have a sharp point to start fast and are color-matched to blend into the surface on the most popular deck boards.
Grooved Decking
The best fasteners for any grooved decking are CAMO Universal Deck Clips: EDGE® Clips for 90° deck patterns and EDGEX® Clips for any deck pattern on wood joists, and EDGEXMETAL® Clips for installs on metal joists. They are fast and easy to install— EDGE Clips sit on the joist while EDGEX Clips fit in the board’s groove, so you can quickly place them with one hand and set rows of boards and clips in place before fastening.
CAMO Universal Deck Clips feature a stainless steel gusset that holds the boards down, making them 88% stronger than competitors’ clips in reducing lateral movement and up to 50% stronger in uplift holding power. Plus, the plastic clip body covers the joist completely and creates consistent 3/16 in. spacing, making a perfect install possible.
These clips also offer the best install experience, coming with the NEVER-MISS Guide that sits over the screw, so you can quickly direct the bit onto the top of the screw. For the fastest installation, you can use the CAMO ClipDRIVE® or DRIVE stand-up tools to fasten while moving from joist to joist. Finally, they’re backed by a CAMO warranty, so you can confidently use them for any grooved decking install.
Exterior Fasteners for Any Install
We know you need fasteners for more than securing the deck boards, and CAMO has you covered there too. Whether you need nails to secure framing, joist hangers, or hurricane straps, or deck and trim screws for other wood-to-wood or finish applications, you can rely on CAMO exterior fasteners to secure your projects.
So when it comes to installing your decking, it may seem like there are many deck fasteners to choose from. But to get the job done well, so you can enjoy your outdoor living space, you’ve got to choose CAMO.
ClipDRIVE QR

Decking Diagonally: Design Ideas and Fastening Tips with Hidden Clips
Dreaming of a deck where the familiar horizontal layout takes a stylish turn? Diagonal decking offers a distinct shift in perspective, breathing fresh life into your outdoor space. Get inspired by creative decking design ideas, and learn how to achieve a successful angled installation with our tips.
Diagonal Decking Designs
Explore these diagonal decking ideas to spark your creativity for a custom retreat that’s truly special.
- Framed Field
Combine diagonal decking with border accents in distinct colors or materials—from subtle contrasts to bold statements—for a polished picture-frame border that adds definition.
- Diagonal Stripes
Alternate the color or material of deck boards in diagonal stripes for visual interest and a sense of movement. Consider varying the stripe widths by laying more or less boards.
- Diamond Pattern
Arrange diagonal decking boards into diamonds for a classic design that brings elegance to your deck.
- Diagonal Definition
Delineate specific deck areas, such as the dining, firepit, and grilling zones, with diagonal decking sections.
- Chevron Pattern
For a modern take, consider a sophisticated chevron pattern that complements contemporary settings.
- Herringbone Style
Achieve an impressive effect with a herringbone configuration. Mix colors or wood species to further enhance the pattern.
- Spiral Layout
Arrange diagonal decking in a spiral pattern radiating from a central point for a dynamic, eye-catching design.
- Inlaid Geometrics
Experiment with shapes and motifs by combining horizontal, vertical, and diagonal boards into custom geometric inlays.
Diagonal Decking Tips
Ready to turn your design vision into reality? Here are some tips for installing your diagonal decking.
- Plan Ahead
Plan your layout to optimize material usage and minimize waste. Account for board orientation, seam placement, and features like stairs or railings.
- Ensure Proper Support
Follow manufacturer guidelines and local codes for joist spacing and sizing. Consider reinforcing joists and support beams to accommodate the unique stresses of diagonal decking.
- Keep the Surface Clear
Don’t let visible fasteners detract from your diagonal decking pattern. Choose hidden deck fasteners so your decking can shine.
- Select the Right Hidden Fasteners
Choosing the right hidden fastener for your diagonal decking depends on three key factors:
-
- Reliability
Choose deck fasteners with the holding strength and stability for a secure, long-lasting decking surface.
CAMO WEDGECLIP™ fasteners were designed for any deck as it offers superior lateral movement resistance and stronger uplift holding power than other clips on the market.
- Compatibility
Make sure your fasteners are compatible with your decking and framing materials.
CAMO WEDGECLIP™ is warranted for use with the leading grooved deck boards and are compatible with wood, composite, capped composite, and PVC decking. WEDGEMETAL™Clip is also suited for angled installations on metal framing.
- Reliability
-
- Ease of Use
Many clip systems require time-consuming pre-installation: A first pass for initial placement between boards, then revisiting each for the final screw down.
CAMO Clips are different. They’re designed for efficient and easy installation. The clips create consistent 3/16-inch spacings and stay in place for quick, one-pass fastening. CAMO also includes a Never-Miss Guide for precision alignment every time. For even faster installation, attach the CAMO DRIVE® or CAMO ClipDRIVE® tool to your drill to install up to 5X faster from a comfortable standing position.
- Ease of Use
Ready to take on a deck project with a twist? Reach for CAMO Clips: With unbeatable strength, reliability, and easy installation, they’re your go-to hidden deck fasteners to bring your diagonal decking designs to life.
A Guide to Pressure Treated Decking
Learn about the ins and outs of pressure-treated decking and how to handle its tendency to warp.
You’re in good company if you desire a traditional pressure-treated deck. Even though composite decking is on the rise, more than 70% of decks in America have pressure-treated decking. The relatively inexpensive material is easily accessible and simple to install, and you can customize the finish with whatever color stain you choose. Plus, it’s treated to resist moisture, rot, and insects, so you can enjoy your deck for years to come.
However, this pressure treatment process displays one of the most significant issues with pressure treated decking—it is notorious for warping. Let’s cover why boards warp in the first place, how to pick the best ones for your project, storing boards before installation, and handling warped boards while building.
Why Pressure Treated Decking Warps
American eBuilder details the treatment process, noting that the boards are put into a tank to remove any air in the wood before flushing the boards with chemicals (and water) to resist moisture and insects. This process leaves the boards very wet, making them swell and prone to drying out unevenly. According to The DIY Plan, the wood fibers contracting at different rates shift the overall lay of the fibers, resulting in warping, bowing, cupping, or twisting.
While this first occurs during the treatment process, pressure treated decking continues to undergo these stresses of swelling and drying unevenly each time it gets wet.
How to Pick The Best Pressure Treated Deck Boards
While every pressure treated board is susceptible to warping, there are things you can look for when selecting your decking to get the best boards for the job. The DIY Plan has a comprehensive list of what to look for when selecting pressure treated lumber, which includes looking at the end of the boards when they are in a stack and selecting boards that have narrow growth rings and don’t have the pith (the dark center of the tree) as wood is more likely to move and twist around the pith. It’s also best to select boards where the grain runs straight along the face of the board and to leave any board that already has some curve. Finally, try to purchase the driest pressure treated decking to save time drying it out. Bring a wood moisture meter to check on the moisture content of the boards while at the store.
Alternatively— and if your budget allows —consider buying Kiln-Dried After Treatment (KDAT) decking instead of wet pressure treated boards. As its name suggests, these boards are dried evenly in a kiln after treatment to reduce potential warping, cupping, or twisting. KDAT decking is more expensive; however, if you purchase wet pressure treated boards, you will spend more time allowing them to dry out before installing them.
Storing Boards Properly Before Install
While you can install wet boards as is, you may not have consistent gapping once the boards have dried out, and it adds a lot of stress for your fasteners to keep the boards down. The better option is to allow your decking to dry before installation but be warned: this can take up to a couple of weeks with wet pressure treated decking.
There are a few steps to drying the decking as evenly as possible. First, choose a flat area protected from potential rain. Then lay the decking flat across additional lumber and place stickers between rows to allow for ventilation. Don’t place your decking directly on grass or concrete since the wood will absorb moisture. Finally, put heavy weights, like concrete blocks, on top of the pile of boards to keep the boards as straight as possible.
How to Install Pressure Treated Deck Boards
Before you install the deck boards, pay special attention to your framing to ensure your decktop has the best chance to dry evenly whenever it rains. Be sure the structure allows for proper drainage and airflow to prevent moisture retention in the boards. Your deck surface should be sloped a minimum of 1/4 in. per 12 feet of horizontal run to allow for moisture run-off, and you must have unobstructed airflow under 50% of the deck to allow for sufficient cross ventilation from one side to the other.
When you place the boards, think, “frown down.” That means the rings on the deck board ends are facing downward— the direction of a frown —when laid flat on the joists for fastening. Doing this will reduce the natural tendency for the board to cup upward when it dries.
Spacing is also important to consider. If you install wet boards with a moisture content above 19%, little to no spacing is needed, as the boards will shrink as they dry. However, if you dried your boards or are using KDAT, leave 3/16 in. spacing between boards to allow for expansion and contraction.
With all those factors covered and the right fastener for your job on hand, you can take the final step of fastening boards. But this is where you might have done everything right, but the board still has a bow like you can’t believe. That’s where the CAMO LEVER® comes into play. This tool straightens warped boards effortlessly, and you can even tackle it yourself.
Start by setting your board in place and fastening one end. Then, set the joist width on the LEVER—the Single Joist setting accommodates joists 1-½ in. wide, and the Double Joist setting accommodates joists 3 in. wide. Place the LEVER on the joist at the opposite end of the board and tighten the joist cam with the pivot pin. Apply pressure by moving the handle towards the deck board and keep turning until the board is in the desired fastening position. Fasten the board, then release pressure by moving the handle away from the deck board. Then, loosen the joist cam and remove LEVER. That’s it. Follow this process with each board for a straight deck, then seal or stain the surface for added water repellant and a beautiful, long-lasting deck.
Pressure-treated lumber is still an excellent option for building your deck, so long as you treat it right. With this guide in mind and the proper time and tools for the job, you will have a pressure -treated deck you can enjoy for years to come.